Showing posts with label Occasions Mini 2008. Show all posts

Wednesday, July 2, 2008

Organizing Your Card Stock Scraps

We all have the problem of not wanting to throw-away scrap pieces of CS....but what can you do with them? ...other than throw them in a box or envelope to go through later...

Perturbed

Well, yesterday I came up with my solution...and I hope it can help you as well.

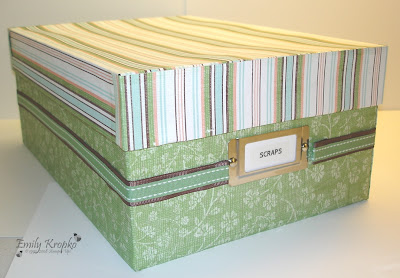
I recently bought a photo storage box at Target that was on clearance..I got it for only $2! To brighten it up a bit, I took some leftover Afternoon Tea DSP and covered the box and lid using Modge Podge. I then put Chocolate Chip 5/8" Grosgrain and Wild Wasabi Double-Stitched ribbon around the box with Sticky Strip. The "SCRAPS" label was made using my Dymo Label Maker...love that thing..

Here's the finished box...


Here is the inside of the box...


I made the dividers using 5" x 8" Index Cards...unfortunately, my local office supply store only had colored Index Cards. I cut the Index Cards down to 3 7/8" x 7 5/8" so they would fit inside the box and still leave room for the tabs to clear the lid.

To make the tabs, I used my Rounded Tab Punch. I punched out each tab using that particualar color, to make for easy filing. That way when I have a scrap of Pixie Pink, for example, I will be able to check the color to the name before filing it. I attached the tabs to the Index Cards using snail adhesive.

I hand-wrote the color name on each tab and put them in order of color families....starting with Neutrals, 07-08 In Colors, Bold Brights, Earth Elements, Rich Regals, and Soft Subtles. I will of course make new tabs for the 08-09 In Colors once I receive the CS.

Here is a close-up of the dividers with my scraps filed...


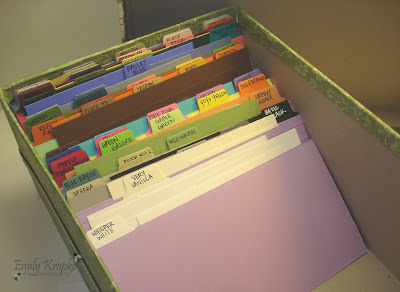
As you can see I don't have enough scraps to fill the entire box. That is mainly because I only keep CS scraps that I could punch a 1" circle out of. Any smaller, I find it doesn't get used. *Although, when it comes to DSP, I do keep small strips....you can always add a strip to a card in place of ribbon.* Winky

Card Stock: Afternoon Tes DSP, Scraps of every CS color for Tabs
Accessories: Chocolate Chip 5/8" Grosgrain ribbon, Wild Wasabi Double-Stitched ribbon, Sticky Strip, Rounded Tab Punch
Non-Su! Accesssories: 5" x 8" Index Cards, Modge Podge, Dymo Label Maker

I hope you can now make your CS scraps more easily acessible. They really come in handy!
I can't believe tomorrow is already the 4th of July! Flag Wave
...2008 is really flying by....

Saturday, June 28, 2008

Occasions Mini Catalog

Just a quick reminder that there are only 3 days left to order from the Occasions Mini Catalog!


Don't miss out on the stamp set or accessory that you have been eyeing from the Occasions Mini. Contact me now to place you order.

Lemonade Swap

This was a swap Linda Jensen showed us how to make at this month's Demo meeting. So adorable!!!

It's a glass of Lemonade made from Vellum CS! Wow...what will they think of next?!

*A little note on the Vellum CS...Stampin' Up! offers two types of Vellum, Paper and Card Stock. There is a big difference between the two. Vellum Paper will give you that "cloudy" look with a thin paper, where the Card Stock is much thicker and durable. Projects like these work much better with the Vellum Card Stock.*

Ice Water

To make the lemonade glass, start with a 3 1/2" x 3 1/4" piece of Vellum CS. Cut 3/8" from both sides at an angle, then score 1/4" in on each side. Sponge the inside of the vellum with Yo Yo Yellow ink, to look like lemonade. Then place Sticky Strip along both scored edges (wings) and adhere to mat, making sure to "round" the glass up before attaching. If you want a "sugared" rim...before adhering to the mat, apply Dazzling Diamonds glitter to the rim with the Glue Pen.

Here's a close-up...sorry the pic is a little blurry, my camera wasn't focusing properly.

Add a straw and a stamped lemon....and your lemonade glass in complete! This is the perfect card to use the Scratch 'n Sniff technique...*I offer Scratch 'n Sniff directions on my instruction sheet for this card.*

Stamp Sets: Tart & Tangy
Card Stock: Wild Wasabi, Basic Black, Whisper White, Vellum CS
Inks: Yo Yo Yellow
Accessories: 1 1/4" Circle Punch, Glue Pen, Dazzling Diamonds, Sticky Strip
Non-Su! Accessories: Striped Straw
Now go grab yourself a glass of lemonade and relax! Sandy Beach

Friday, June 27, 2008

Tart & Tangy Basket

I got the pattern for this cute little basket from Dawn Griffin. Isn't it cute?


It was really simple to make and holds little odds & ends on my desk.... I really like the Rose Red/Certainly Celery color combo for the strawberry. It's so sweet looking.

Strawberry

Stamp Sets: Tart & Tangy
Card Stock: Certainly Celery, Rose Red, Whisper White
Inks: Certainly Celery marker, Rose Red marker
Accessories: 1 3/8" Circle Punch, Scallop Punch, Sticky Strip, Dimentionals
Have a sweet day! Candy

Monday, June 23, 2008

Carousel Notes

I thought I would share a project I did for Easter with my Thurs AM Stamping Club using the Carousel Notes from the Occasions Mini. I used the stamp set A Good Egg, but you could change to center image to a current holiday instead of using the Easter egg...


The Easter egg was stamped with Stazon ink. Inside the egg, the flower background was stamped with White Craft ink, then Heat & Stick powder was sprinkled over entire image. I used the Heat Tool to make the powder tacky and then covered it with Celery Fine Cosmo glitter. Using the Heat & Stick powder enables you to use the Fine Cosmo glitter on detailed images.

The Flower is from the Pretties kit and was colored pink using an Aqua Painter and the Pretty in Pink stamp pad. With the stamp pad closed, squeeze the pad to put ink on the top cover. Then when you open the stamp pad, you take ink with the Aqua Painter from the lid, instead of dirrectly from the stamp pad. That will make your stamp pad ink last longer between re-inkings.

The Spring Fling DSP was cut using the Coluzzle Cutting System. That's a great Accessory for the Carousel Notes....

Stamp Sets: A Good Egg
Card Stock: Wild Wasabi Carousel Note (Occasions Mini), Spring Fling DSP, Barely Banana, Pretty in Pink, Whisper White
Inks: Black Stazon, White Craft Ink, Pretty in Pink pad
Accessories: Pretties Kit, Heat & Stick Powder, Celery Fine Cosmo glitter, Tombo Multi Purpose Adhesive, Pink Chunky Sprinkles glitter (Occasions Mini), Aqua Painter, Certainly Celery 1/4" Grosgrain ribbon, Coluzzle Cutting System, 1/16" Circle Punch, Dimentionals
Thanks for looking.... Computer


Friday, June 20, 2008

Baby Onsie Card

I showed my Thurs Am Ladies how to make this card at club a couple of months ago. I thought I would bring it back out since the Big On Spring stamp set is from the Occasions Mini and it will be gone in a matter of days...

Crying 2

I just thought this was adorable! A card in the shape of a onsie...who new it could be done. I don't know if you can tell from the picture, but I used 2-way Glue and Dazzing Diamonds glitter on the heart inside the stamped onsie.

*I do have a detailed instruction sheet for this card available for purchase...*

Stamp Sets: Big On Spring
Card Stock: Pretty In Pink, Pretty In Pink Prints Pack DSP (Hostess Level 1)
Inks: Stazon Ink
Accessories: 1 3/8" Circle Punch, Scallop Circle Punch, Paper Piercer, Corner Rounder Punch, Versamarker, 2-Way Glue Pen, Dazzling Diamonds glitter, Dimentionals
Have a fantastic day! Diving

Thursday, June 19, 2008

Bloomin' Pretty Swap

I just love the Bloomin' Beautiful stamp set! Let's hope SU! brings it back for the Fall-Winter 2008 Catalog...

Fingers Crossed

This swap was created by Chris McKnight. Isn't it elegant? The pearls from the Pretties Kit are a beautiful embellishment.

Stamp Sets: Bloomin' Beautiful, Sanded Background stamp, Itty Bitty Backgrounds
Card Stock: Regal Rose, Mellow Moss, Confetti White
Inks: Regal Rose pad, Regal Rose marker, Rose Red marker, Mellow Moss marker
Accessories: Regal Rose 5/8" Grosgrain ribbon, Pretties Kit, Designer Label Punch, Small Oval Punch, Ticket Corner Punch, Dimentionals
Happy Stamping! Scrapbooking


Saturday, June 14, 2008

50-50 Bar Card

First off, yes I know what that is...everyone always thinks I am too young to know what a 50-50 bar is. My mom loves them!! Although I did grow-up in the era of calling them Creamsicles, my mom still calls it a 50-50 bar.

Ice Cream 4

(Can you believe that on my Smilie program, this was the ONLY popsicle they had to choose from?!)

Anyway, back to the card....this card is so C-U-T-E! I first saw it at our Semi-Annual So-Cal Demo meeting a couple of month's ago. Sue Reynolds had created it. I don't know where she got the idea, but I love it!


It's a perfect match for the One Smart Cookie and Tart & Tangy sets!! The orange image is even Scratch 'n Sniff!

Nose

Inside the card, I used the Hotess Level 1 set, For a Friend. I took the small orange image from One Smart Cookie and put it over the heart cloud with a half of a dimentional. Now it looks like, thinking of oranges... Here is a close-up:


I think the Pumpkin Pie Striped Grosgrain ribbon really finished it off...

*I do have the instruction sheet available for purchase, $3 each. It has the exact CS dimentions, as well as how-to make the orange scratch 'n sniff! Contact me for your copy...*

Stamp Sets: Tart & Tangy, One Smart Cookie, For a Friend (Hostess Level 1)
Card Stock: Pumpkin Pie, Whisper White
Inks: Versamark ink, Pumpkin Pie pad, Pumpkin Pie marker, Old Olive marker
Accessories: 1 1/4" Circle Punch, 1 3/8" Circle Punch, Pumpkin Pie Striped Grosgrain ribbon, Dimentionals
Hope this card will give you cool thoughts....Frozen ....I think it is offically Summer weather now.

Friday, June 13, 2008

Green Apple Suspenion Card

This is one of the cards we made at my Thursday AM Stamping Club last week, although club ended up meeting on Tues instead of Thurs...lol.

So, what is a suspension card? It's exactly what it sounds like....an image is suspended on the card. I learned this technique from Dawn Griffin...she is a very tallented stamper!

I used the Apple image from the Tart & Tangy set, but for the first time I decided to make it a Granny Smith....since my favorite color is green.

Winky


The image is "framed" with a scallop frame. To make one, you would first punch a 1 3/8" Circle out of your CS, leaving plenty of room all around the punch-out. Then punch a Scallop, centering it around the punched-out circle. Very simple and cleaver!

The ribbon I used is from the Occasions Mini...it's the Chocolate Chip Poly-Twill ribbon.

Also, I make instruction sheets for all of the cards/projects I do with my Stamping Club, including this one. I list the supplies needed, exact CS dimentions, and detailed step-by-step how-to. I would gladly forward any of them to you, for a fee of $3 each. Just contact me if you are interested. I will try to mention from now on any project where I can offer to sell my instruction sheet....

Stamp Sets: Tart & Tangy, One Smart Cookie
Card Stock: Old Olive, Whisper White, Summer Picnic DSP
Inks: Old Olive pad, Chocolate Chip marker, Garden Green marker
Accessories: Chocolate Chip Poly-Twill ribbon, White Gel Pen, Crystal Effects, 1 3/8" Circle Punch, 1 1/4" Circle Punch, Scallop Punch, Sticky Strip, Natural Twine

Have a nice weekend.....and try to stay cool! Sweaty


Thursday, June 12, 2008

Embossed Blossom Swap

This beautiful swap was from last month's Demo meeting, and it was created by Linda Cuellar. It's a very simple and elegant looking swap.


She embossed the image with Gold embossing powder and then used Watercolor Wonder Crayons to color the image in. She even added doodle dots to the center of the flowers. Here is a close-up:


*Did you notice I solved my Watermark dilemma for other people's swaps? If I ever get some spare time, I will make a simple watermark for each crafter....*

Stamp Sets: Bloomin' Beautiful, Elegant Cheer, Canvas Background Stamp
Card Stock: Almost Amethyst, Confetti White, River Rock
Inks: Gold Encore Pad
Accessories: Gold Embossing Powder, Heat Tool, Watercolor Wonder Crayons, White Gel Pen, Dimentionals
Have a great day! Sunny

Wednesday, June 11, 2008

Bloomin' Workshop

Yesterday I had my Bloomin' Workshop using the beautiful Class Planning Service designed by Andrea Walford. She helps us Demos out by offering classes for us to teach our customers. My ladies had such a great time making this stationary set!!
A+


They made a portfolio and four cards that fit inside the portfolio. Here is a close-up of the portfolio, showing how the it slides out of the case...


Here is another close-up of the embellishing inside the portfolio....


Here you can see how the four cards, and envelopes, fit inside the portfolio....


Card #1: Single Bloom Soft Sky Card....


Close-up of the dimentional detail...


Card #2: Groovy Guava Blooms Card....


Card # 3: Double Blooms Groovy Guava Card....


Close-up of the 3-D blooms....


Card #4: Wild Wasabi Blooms Card....


This makes such an amazing gift for some special! The Bloomin' Beautiful Stamp Set, Afternoon Tea DSP, and In Colors coordinate perfectly!

I may offer this Workshop as a take home kit. I would pre-cut & pre-score everything for you and include instructions with pictures. I will have to figure out the cost, but let me know if you are interested...

Mailman

Stamp Sets: Bloomin' Beautiful, All Holidays, Holidays & Wishes
Card Stock: Soft Sky, Groovy Guava, Chocolate Chip, Whisper White, Afternoon Tea DSP
Inks: Black Stazon, Chocolate Chip, Groovy Guava, Blush Blossom, Barely Banana, Certainly Celery, Wild Wasabi
Accessories: Chocolate Chip 5/8" Grosgrain ribbon, Blender Pens, Dimentionals, Pewter Brads, Jumbo Pewter Eyelets, Crop-A-Dile, 1/16" Circle Punch, Large Oval Punch, Corner Rounder Punch, Ticket Corner Punch, Rounded Tab Punch, Sticky Strip, Bone Folder, Watercolor Wonder Crayons: Earth Elements & Neutrals Sets


Have a great day! Flower